|

|
|
| Home | Instruments | Science | Experiments | SiteMap |
GSAS/EXPGUI Self-Installer for Windows
A self-installing version of GSAS (General Structure Analysis System) and EXPGUI is available. This program uncompresses itself, copies the required files (including the Tcl/Tk files used in EXPGUI) to a selected directory and either modifies the AUTOEXEC.BAT file and/or creates the appropriate registry entries needed to run GSAS, optionally with EXPGUI. This web page documents the screens displayed by the self-installer.
The self-installer can be downloaded from NIST (ftp://ftp.ncnr.nist.gov/pub/cryst/gsas/gsas+expgui.exe) or several CCP14 mirror sites: UK, Canada or US.
Mailing List. If you would like to get news about about new features & bug fixes in EXPGUI and also support the project by demonstrating how many people use it, please send e-mail to Brian.Toby@NIST.GOV.
Previous GSAS/EXPGUI versions. If you already have GSAS & EXPGUI loaded on your computer, with this installer, you can simply run the new gsas+expgui.exe file. You will get a message reminding you are upgrading and you will not be offered a choice of where to install -- files will be placed in the same directory as before.
If you previously installed using the gsaskit.exe file, you can probably do fine if you ignore the old version and follow the directions below. However, it is perhaps safer to either delete these files from your computer, or else move them into a new directory (like c:\oldgsas or c:\1999gsas) so there is no possibility that you will access any of the old programs by accident. Also, in Windows-95, -95 and -ME, remove previous references to GSAS from your AUTOEXEC.BAT file (see notes about AUTOEXEC.BAT and old Tcl/Tk files following this paragraph.) Note that it is possible to run multiple versions of GSAS using EXPGUI (by setting up shortcuts to the different copies of the expgui files in the different locations), but PC-GSAS will run the first version of the GSAS programs found in the path, and thus will run only the most recently installed version.
Previous AUTOEXEC.BAT modifications. Note that if you are using Windows-95, -98 or -ME, and had GSAS installed, you have modified the AUTOEXEC.BAT file. You should edit this file in NOTEPAD (or SYSEDIT) to remove the older additions so that your PATH definition does not contain extraneous references. In these versions of Windows, there is a limited amount of storage for these definitions, so without cleaning up, you will eventually run out of room even if you have lots of extra memory and disk space. You do not need to reboot after making these changes as that will occur later.
Previous Tcl/Tk versions. The previous instructions for EXPGUI recommended installing the Tcl/Tk programs in a directory C:\TCL or C:\TCL823. These files are no longer needed by this version of EXPGUI, as the self-installer now places these files in the GSAS directory. Thus, the old C:\TCL or C:\TCL823 directories can be deleted to save disk space.
After downloading the program, start it either from the Run entry in the Start menu, or by double-clicking on the icon for the downloaded file. The "Setup in progress..." screen will appear for the minute or two (perhaps as much as fifteen minutes on a very slow computer) while the file uncompresses itself. This step has failed on some computers with previous versions of the self-installer. If you get an error message, please sent it to me.
The first screen shows the program version. Note the installer will reboot your computer, so you should close all programs that matter to you.
The copyright information is shown, so that all the lawyers can be happy.
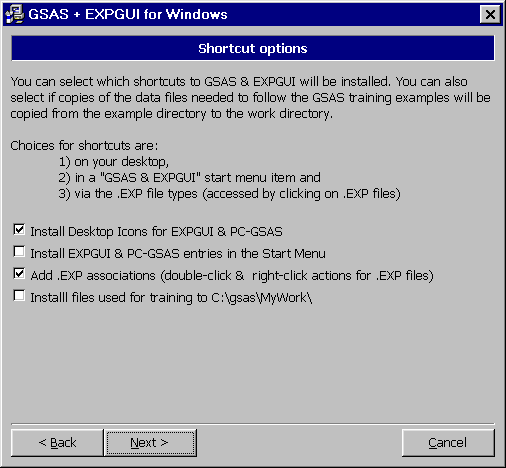
On this screen and the next you actually get to make some choices! You can decide what shortcuts will be provided for accessing EXPGUI and various GSAS programs. The options are explained immediately below.
- If ".EXP association" is selected on the next screen, registry entries are created so that if one right-clicks on a .EXP file, a set of choices are offered for acting on the file, as shown above. For example, selecting EXPEDT from the pop-up menu, invokes the EXPEDT program to edit options in the file. Double-clicking (with the right mouse button) invokes the default action. The choices on the current screen, allow the selection of the which program will be invoked upon a double-click.

- If desktop icons are selected, these two icons are placed on your desktop, as above. Clicking on them will start EXPGUI and PC-GSAS. Note that the default directory for these shortcuts will be MyWork in the directory selected for GSAS installation (typically C:\GSAS\MyWork). This can be changed by editing the shortcut properties.
- If the "Start menu" option is selected, a "GSAS + EXPGUI" menu folder is placed in your Start menu, with two items, to start EXPGUI and PC-GSAS. See above. The default directory is set as described for the desktop shortcuts. This can also be changed by right-clicking on the start menu to open it and then setting the properties for the menu entries.
The last option, if selected, causes the files described in the training section of the GSAS manual (for example, the Nickel and Garnet data files) to be placed in the GSAS work directory (typically C:\GSAS\MyWork). This makes it a bit easier to follow the examples given in the manual or on the EXPGUI tutorial web pages.
In this screen you select where the software will be installed. The default, C:\GSAS is a good choice. You can use another drive, such as G:\GSAS or another directory, such as C:\SHAREDFILES\GSAS, but there have been problems noted by people trying to directories with spaces in them, such as C:\Program Files\GSAS, so it is suggested that you do your own debugging if you do this. Note that it is acceptable to use a directory on another computer (such as a file server) but the directory must be mapped as a drive (e.g. S:\GSAS, not \\server\GSAS). Note that all files installed by the program are placed in this directory or subdirectories below. No files are placed in windows system directories, other than registry information that allows the program to be uninstalled from the control panel.
This screen summarizes the input you have supplied. Use the "Back" button to change any selections. Note that at this time, the GSAS work directory is set automatically from the location where the software will be installed.
This screen is displayed as the files are copied to the selected locations.
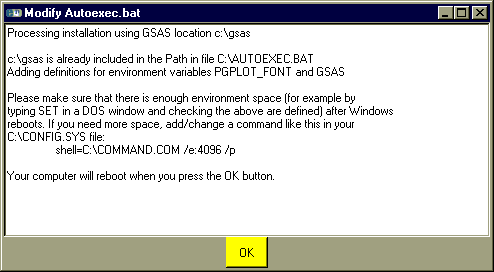
On Windows-95, -98 (and presumably -ME), GSAS must place definitions into the AUTOEXEC.BAT file. This is done by a very short & inelegant Tcl/Tk script that produces the window below that places three or four lines into the AUTOEXEC.BAT file like this:

If the script finds that the current install location is already in the path, the PATH= line is not added to the AUTOEXEC.BAT file. If you have previously made similar changes to the file when installing GSAS manually (or with a previous version of this self installer), the extraneous additions to the path should be removed manually with an editor such as wordpad or notepad. The PGPLOT_FONT & GSAS definitions will override previous information, and only the first copy of the GSAS programs found in the path will be accessed, but there is only a limited amount of space to store the path and environment variables, so it is not good practice to clutter up your path and AUTOEXEC.BAT file.
REM GSAS environment variables, added Tue Nov 27... PATH=C:\gsas\exe;%PATH% set PGPLOT_FONT=C:\gsas\PGL\GRFONT.DAT set GSAS=C:\gsasOn Windows-NT, -2000 & -XP, these definitions are made via the registry, so this window is not seen.
After all installation steps have been completed, the screen to the right is shown. After pressing "Finish", the computer will be rebooted, so that the changes to the path are implemented.
Please note that unexpected behavior in Windows seems to be the rule rather than the exception, so report problems to: tell Brian Toby. Corrections are far less likely without your feedback.
Comments, corrections or questions: crystal@NIST.gov
Last modified 09-February-2005
$Revision: 1.9 $ $Date: 2004/10/05 18:23:48 $